Jekyll Quickstart
Jekyll is a static site generator (SSG). An SSG lets you build reusable templates, and write your content in a flexible format like markdown (both of which make it like in a CMS), and compile the source files into static HTML which is then uploaded to the server. This means that page loads are instant (no database lookups, no dynamic page generation) but you still have 90% of the power of a CMS for editing the website in a flexible way. Pushing updates to the site is usually done with source control, so that when a commit has been reviewed, it is pulled into trunk/master, and gets built and published by an automatic script.
This is a getting started guide for Jekyll and Liquid templates for Windows!
Concepts
- Ruby is a general purpose programming language, but it’s been most popular in building web applications. GitHub itself is built largely with Ruby.
- Gems are packages of Ruby code which somebody has written
- Bundler is a package manager for Ruby, like
npmis for javascript. It lets you easily grab and manage the Gems which your program/website needs. - Jekyll is a static site generator as described above
- Liquid is a template language which gets parsed and run by jekyll, and it allows you to make smart templates with repeating sections, optional sections, and stuff like that.
- Git is a source control system like SVN, but distributed. A very popular place to host a git repository is on GitHub.
Get Started
Git
We need to use the Git Bash shell instead of Windows command prompt for a lot of Ruby things, so we should install it first.
If you don’t already have Git, go to https://git-scm.com/download/win and the download will start automatically. GitHub has a good guide about how to set up Git but this can probably be left for later.
Ruby & Bundler
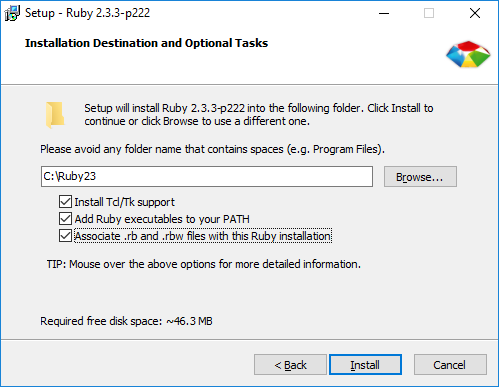
You can get Ruby for Windows at http://rubyinstaller.org/downloads/. Choose the top version. For best compatibility, pick the 32 bit one (the one without (x64)).
- Run the installer.
- Choose your language and accept the license
- Accept the default install location, and tick all the additional feature boxes (see screenshot)
- N.b. if, in the future, the RubyInstaller team has decided to bundle a “browser toolbar” or something, make sure you turn it off/decline the terms/just say no :)
- Click Install
Jekyll
Now go to a folder where you’re going to do your Jekyll website developments. C:/Projects/jekyll/ could be a good choice, or use Documents if that’s what you usually do.
Now we’re going to follow the steps from the real Jekyll quick start guide:
- Right click on/in your folder and choose ‘Git Bash Here’ and a shell window will pop up
- Type
gem install jekyll bundlerto install the jekyll and bundler gems - When it’s done, type
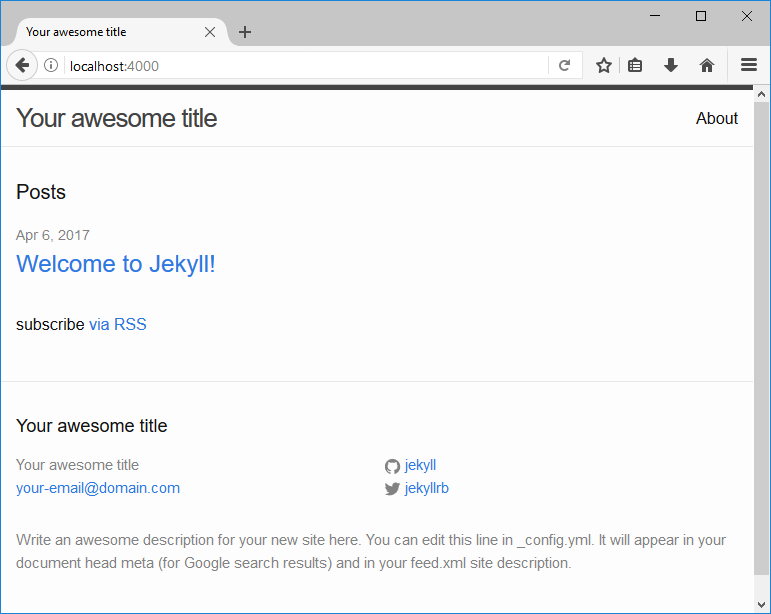
jekyll new myblogto generate a jekyll site - Jekyll will now scaffold a website for you. Type
cd myblogto go into the new folder - Type
bundle exec jekyll sto serve the website locally so that you can test it - Open your browser and go to
localhost:4000or whatever URL Jekyll tells you (if different)
If you’re working offline
If you have installed a jekyll site before, then all of the gems are already present on your PC. To start a new site without an internet connection, you can run the following:
jekyll new --skip-bundle myblog
cd myblog
bundle install --local
Simplifying Jekyll
The default site is a little overcomplicated in my opinion. Jekyll is naturally a very transparent system, but there are a few things in the “boilerplate” site that make it harder to understand.
Let’s gut it!
About layouts and themes
Open up index.md and also _posts/....-welcome-to-jekyll.markdown (the date in the filename depends on when you generated it). The stuff between the lines is called “Front matter” and it’s metadata - data which describes the file.
---
layout: post
title:  "Welcome to Jekyll!"
date:   2017-04-06 08:18:29 +0100
categories: jekyll update
---
Each file specifies a layout. This says which layout to use, so posts can use one layout, main pages another, etc… Normally each of these correspond to an html file in the _layouts folder, but where is it?
First, instead of giving you the usual _layouts folder, the boilerplate blog installs a theme called minima, as a gem, so that you never see its layouts. In fact, to find them, you can go to C:\Ruby23\lib\ruby\gems\2.3.0\gems\minima-2.1.0 (may vary on your system).
We want to write our own templates with our own Liquid layouts, so let’s destroy!
Smashing gems and unconfiguring
In your site directory, open Gemfile. Find the following (nicely commented) lines, and delete them:
# This is the default theme for new Jekyll sites. You may change this to anything you like.
gem "minima", "~> 2.0"
Now open _config.yml and find and delete this line:
theme: minima
Now delete about.md. It uses the include feature to include some images which are only found in the minima theme, so let’s ditch it for now
Try and fail
Now we’re going to serve the site, but it will be empty. We have essentially removed all of the templates, so none of the content will have any way of displaying. Run the following command, then open http://localhost:4000, and it will be blank:
bundle exec jekyll s
You should also see some warnings in the Bash window:
  Generating...
 Build Warning: Layout 'post' requested in _posts/2017-04-06-welcome-to-jekyll.markdown does not exist.
 Build Warning: Layout 'home' requested in index.md does not exist.
By the way
As we’re in Bash, we can set up some shortcuts which help us type commands quicker.
Go to C:\Program Files\Git\etc and open bash.bashrc in your text editor as an administrator. At the very very bottom, add a new line:
alias jeks='bundle exec jekyll s'
Then close and re-open your Bash window(s). Now you can type jeks instead of bundle exec jekyll s. You can change the alias “jeks” to anything you want.
Make your own templates!
We are going to go for the very simplest setup, where every page is rendered using the same template.
- Make a
_layoutsdirectory in your site folder - Add
default.htm(or.html) - Open it
Throw in a very basic HTML something like the following:
<!DOCTYPE HTML>
<html>
<head>
<title>SteGriff</title>
<meta http-equiv="content-type" content="text/html; charset=utf-8">
<meta name="viewport" content="width=device-width, initial-scale=1.0">
</head>
<body>
	<p>We are here to make much of God - to make God look great (which should be easy because he <em>is</em> great). Lent is a opportune time for this, because we have so many options:</p>
Doing anything for lent?
-
Yes, I’m giving up chocolate/meat/video games/tv/facebook/food for 40 days because Jesus is such a satisying treasure that I can go without that other thing!
-
You know me, I’m not religious, I just believe that Jesus is the hope of the world, and he is pursuing you because you’re his precious child
-
Yeah, I’m trying to remember every day to ask God to carry my burden, because life is so much better when he’s the one accomplishing everything - he does a much better job.
Burdening God is Good
When we hesitate to burden God, we are viewing him like a human. Harassed, ungenerous, reluctant. God joyfully and readily takes on everything we can load on him, because he is a tireless father with a generosity and a holy pity that never end. If our only interaction with God each day is to say at the beginning, “Lord, carry my load, I don’t want it” and at the end, “Lord, you did it, and you did it so well” then look, you made much of God! You fulfilled your earthly purpose today by humbly asking your father in heaven (who is much greater than you) to carry your stress and workload for you and then making a big deal of him when he comes through!
Publicly revealing the worth and goodness of God is an act of worship which will help to save the world.
Join in! Burden God today!
</body>
</html>
For your first taste of Liquid; we have used two variables. site.title comes from the config.yml file we saw earlier, and content is a special variable which renders whatever file has been requested (like index.md if we’re on the front page)
Then edit index.md, change the layout in the front matter and add some content:
---
layout: default
---

# Hello World

## This is my Jekyll site

I'm writing a page, haha #wow
Your site will automatically regenerate, so refresh the browser and you should see your dead simple, unstyled page. Check the HTML source to see how it has been put together.
We have to go simpler!!
I don’t like front matter. And I definitely don’t like repeating myself. So handily, we can configure Jekyll to fill in a default value for most front matter things across the site so that we don’t have to specify them.
Open up _config.yml and add in a section somewhere:
# Set default.html as default layout for everything
defaults:
  -
	scope:
	  path: "" # All files in the project
	values:
	  layout: "default"
While we’re here, delete the unused lines for twitter and github usernames:
twitter_username: jekyllrb
github_username:  jekyll
Any time you edit _config, you have to restart the jekyll serve process for the change to take effect. To do that, go into the Bash window, hit Ctrl+C, then run the jeks command again.
Now you can edit index.md to change the front matter to the following:
---
---
Yep, nothing. The front matter section is required for Jekyll to acknowledge that the file exists, but now we don’t need any information in it at all!
Extreme minimalism
If you want to write files without the front matter section, you can install the gem “jekyll-optional-front-matter” but I leave this as an excercise for you. The downside is that files without front matter won’t parse/render any liquid templating! :( So you will be limited to plain-old-markdown.
Using Liquid in Jekyll
Ok, so far we’ve:
- Met the concepts
- Installed Ruby and Jekyll
- Simplified Jekyll
Now it’s time to make it look reasonable, and to produce something useful with Liquid.
I have taken the above example, made a few extra tweaks, and made it into a GitHub repo which you can clone-and-go. It’s called ‘simpyll’ … :]
To get it, go into your web development directory, open up Git Bash, and run
git clone https://github.com/stegriff/simpyll