Let’s make a NuGet Package
I wanted to make a NuGet package for Paprika.Net so I’ve documented the process here to make it easy for beginners to follow along! This guide is based on publishing one project alone, if you have a more complex need then you should read about deciding which assemblies to package.
In writing this guide I have found that there are two approaches:
- Use the NuGet CLI to spec and pack your package from the command line
- Use the built-in features in Visual Studio 2017 (it may have been introduced in a 17.3 or 17.4 update, so make sure you update your VS first)
Also, I went all the way through writing this guide and my package didn’t work because I wasn’t careful about targetting. This forced me to learn about the differences between .Net Framework, Core, and Standard, so I have written a separate post about that!
Approach No. 1: Using the CLI
First, go to nuget download page and download the recommended version of the Command Line tools even if you have Visual Studio; the command line tools are stand-alone and are not included with the NuGet Package Manager in VS.
Once you have installed it, put it in your PATH. If you don’t know what you’re doing, try my Windows /usr/bin trick.
Write or generate a .nuspec
The nuspec file tells NuGet about your package; what it contains, what it’s called, its version information, etc. It is an XML file which can be written by hand, or better, generated!
Open a command prompt in the directory of the project you want to publish. This sets the name of the file intelligently, but it doesn’t set any of the content (the content is always 90% the same). Use the nuget spec command:
C:\Projects\ste\paprika.net\Paprika.Net>nuget spec
Created 'Paprika.Net.nuspec' successfully.
You can set some more of the info automatically using the -a flag and pointing it at an assembly. This will set the version, id, authors and owners, but you might want to change some of those anyway:
> nuget spec -a .\bin\Release\Paprika.Net.dll
Now open the created nuspec file in your text editor of choice. It looks something like this:
<?xml version="1.0"?>
<package >
  <metadata>
	<id>$id$</id>
	<version>$version$</version>
	<title>$title$</title>
	<authors>$author$</authors>
	<owners>Stephen Griffiths</owners>
	<licenseUrl>http://LICENSE_URL_HERE_OR_DELETE_THIS_LINE</licenseUrl>
	<projectUrl>http://PROJECT_URL_HERE_OR_DELETE_THIS_LINE</projectUrl>
	<iconUrl>http://ICON_URL_HERE_OR_DELETE_THIS_LINE</iconUrl>
	<requireLicenseAcceptance>false</requireLicenseAcceptance>
	<description>$description$</description>
	<releaseNotes>Summary of changes made in this release of the package.</releaseNotes>
	<copyright>Copyright 2017</copyright>
	<tags>Tag1 Tag2</tags>
  </metadata>
</package>
Read through the file for a sec. At this point I realised I needed to add a license to my GitHub project, and I wanted to add an icon too. So I checked these things into the GitHub repo and pasted the URLs in here.
Some of the $values$ will be replaced at Publish-time by automated values. Including $version$.
You should fill in:
id(likeSteGriff.Paprika.NetorMyNameOrCompany.ThisPackage.Componentauthorsandownerswith your actual name/company name- the
*Urlsections (or delete the whole line if you don’t want/need them) tags(for discovery on the NuGet package gallery)
If your package has dependencies, fill in the <dependencies> section. Mine does not, so I can delete it!
Add files in the .nuspec
Below the <metadata> section, we are going to add a <files> section which describes the DLLs and supporting files which you are going to package:
<metadata>
	...
</metadata>
<files>
	<file src="bin\Release\Paprika.Net.dll" target="lib\netstandard1.3\Paprika.Net.dll" />
</files>
The target section has to match the specification for what goes inside a .nupkg file, you can find out more on the MS creating a package post. But I’ll keep it simple! Your package’s main libraries go to the lib\ path, nested under the framework API/version which they are for.
While it is possible to put your DLL directly under lib\ with no framework folder, this means that you will only target the framework that you built for and your package won’t provide proper info about this to the consumer. It’s not recommended!
You can add static files too, read this great MVP post about creating packages for more info.
Use nuget pack from the command line to package according to your spec file. This should create your nupkg file. A nupkg is a zip file, so you can inspect it by changing the extension to .zip and looking inside.
Skip ahead to the ‘Testing’ section!
Approach No. 2: Using Visual Studio
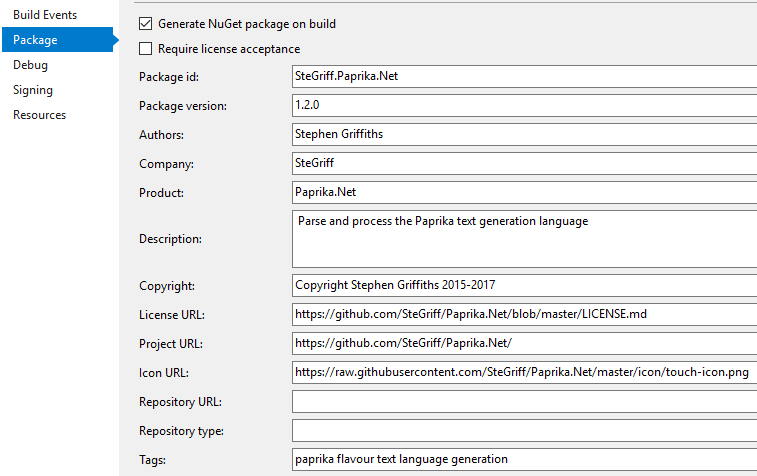
In Visual Studio, right click the project you want to export, and open its Properties page. Go to the Package tab.
- Tick ‘Generate NuGet Package on Build’
- Fill in the fields - for help see the nuspec section in Approach 1
- Build your project in the Release configuration
- You will be able to find the generated nupkg file in the bin/Release directory
Testing a package from either approach
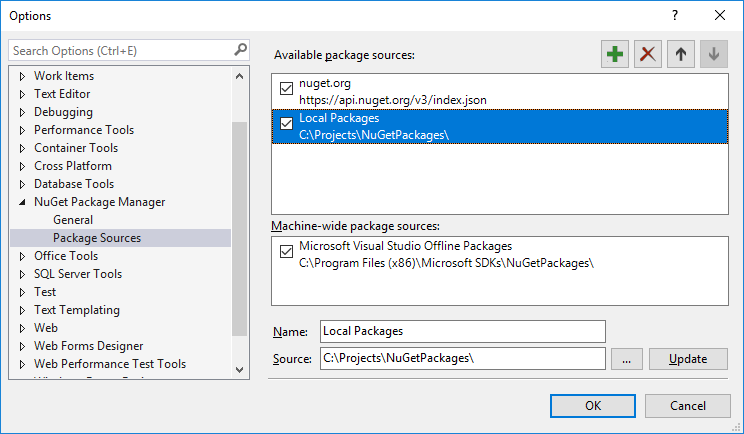
First we’ll make a local package repository:
- Copy your nupkg file and paste it in a new directory at
C:\NuGetPackages - In VS, go to Tools, Options, NuGet Package Manager (expand the drop down arrow), Package Sources, and click Add.
- Select the newly added entry; change the source to
C:\NuGetPackages, and change the name to ‘Local Packages’.
Now we’ll test your package in a fresh project:
- Start a new VS project (using a framework you intend your package to work with)
- Right click the solution in Solution Explorer, and click ‘Manage NuGet Packages for Solution’
- Change the source drop-down in the top-right to ‘Local Packages’
- Go to the Browse tab and your package will appear
- Install your package
- Test its features! Remember you might need to build and add a
usingstatement at the top of your code.
Publishing a package
Packages can be published from the command line or the NuGet website. The website is easier for newbies like me.
First we need to set your NuGet account up correctly:
- Go to NuGet.org and login/register with your Microsoft Account (activate via email if necessary)
- Click your username in the top right and go to ‘API Keys’
- Generate a new key which has access to upload new packages. Take security precautions such as a short expiry time or filling in a glob pattern if you want to.
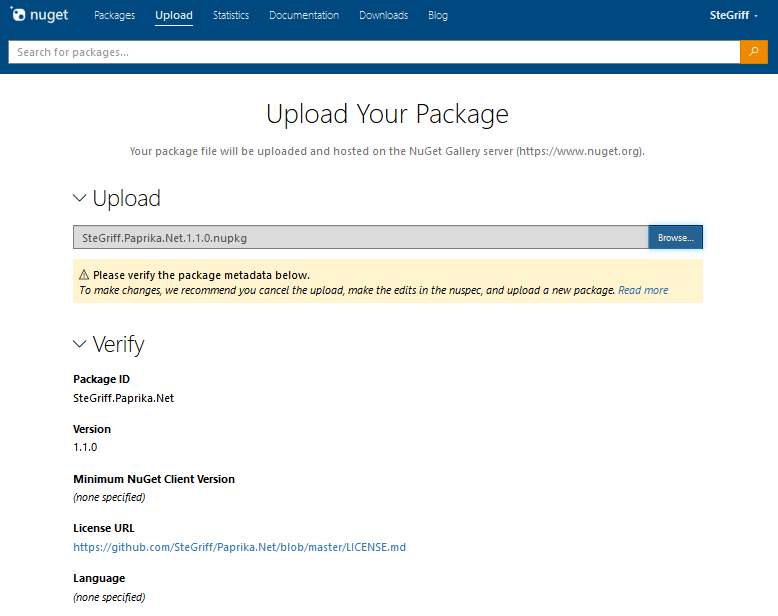
Now we can upload:
- Go to the Upload tab of the site
- Browse to your nupkg and upload it
- Fill in any missing details
- You may wish to add user docs or the contents of your README.md into the documentation section
- When you are happy, go to the bottom of the page and click Submit!
After your package is verified and indexed, it will be leave in the NuGet package repository!
Congratulations for publishing your first package :)