Setting up IIS for the first time
Windows has a built-in webserver called Internet Information Services (IIS). It’s often switched off by default, but it’s easy to switch it on and use it to host a local website!
Getting IIS
- Press the Start button or key
- Start typing ‘Windows features’
- Click ‘Turn Windows features on or off’
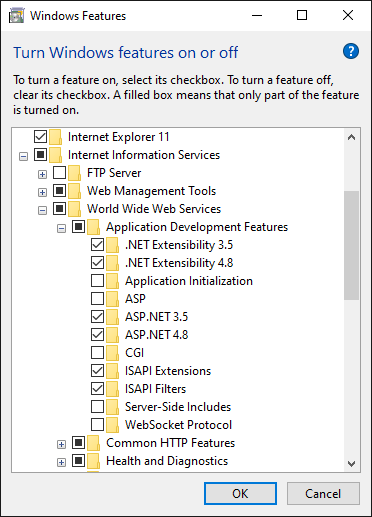
- Scroll to ‘Internet Information Services’ and expand it
- Drill down through ‘World Wide Web Services’, then ‘Application Development Features’, and check that at least the following things are switched on, as pictured to the right:
- .Net Extensibility 3.5
- .Net Extensibility 4.8
- ASP.NET 3.5
- ASP.NET 4.8
- Click OK and wait for Windows to finish adjusting
Configuring a site
- Hit start and type ‘IIS’ (perhaps pin it to your Start menu once you see it)
- In the left nav, expand your PC
- Right-click Sites and choose ‘Add Website…’
- Give the site a name (for your reference only)
- Choose the ‘Physical path’ of the site
- Usually you would install your site in a directory within the
C:\inetpub\wwwrootfolder, likeC:\inetpub\wwwroot\MyWebApplication - For an ASP.Net site, you should choose the level where you can see a ‘bin’ folder and probably a ‘Web.config’ file
- Usually you would install your site in a directory within the
Binding Option 1 - Bind to PC name, like ‘http://DESKTOP-123456’
This is the easiest option if you just want people on your network to be able to hit your website.
First, find out your computer name (Hit start, type ‘Computer Name’, click whatever comes up, and look for Device/Computer/Machine name).
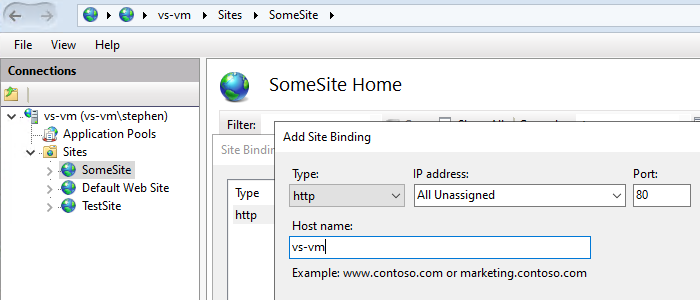
In IIS:
- In the Binding ‘Host name’, enter your machine name. Let’s pretend it’s ‘DESKTOP-123456’
- Leave the port as 80
- Click OK to set up the site
On another PC on the network, open a web browser to ‘http://DESKTOP-123456’
Hopefully your site comes up!
If you find that people on your network can’t get to your PC by its name, you may need to find out your LAN IP address and add a second binding:
- Open a PowerShell (Hit Start, type ‘Powershell’)
- Type
ipconfigand press enter - Look for an
IPv4 Addressstarting 192.168… or 10.40… - Copy it
In IIS:
- Right-click your site in the left nav, and choose ‘Edit Bindings…’
- Click ‘Add…’
- In Host name, paste the IP address
- Leave the port as 80
- Hit OK
Try from another PC to access ‘http://192.168.x.x’ or whatever your IP was.
Binding Option 2 - Bind to a DNS name
This is like having a domain for your website that only works on the local network.
It usually requires the network administrators to set up a DNS binding so that the local domain name points to the IP address of your PC.
However, on your local machine, you can fudge the domain to make it work just for you:
- Open Notepad as an Administrator:
- Hit Start, type ‘notepad’
- Right-click it and choose ‘Run as administrator’
- Go to File, Open…
- In the File Name box, paste in
C:\Windows\System32\drivers\etc\hostsand click ‘Open’
Add a line to the bottom of the file like this:
127.0.0.1 mysite.local
The IP on the left is the localhost address, leave it as-is. After the IP is a tab character, then the name you want to bind the site to.
In IIS:
- Right-click your site in the left nav, and choose ‘Edit Bindings…’
- Click ‘Add…’
- In Host name, paste the name, like ‘mysite.local’
- Leave the port as 80
- Hit OK
Open a browser on your PC, and go to the new address. It should load the site.
On other people’s PCs, they would have to add the line to the hosts file for the address to work unless it has been configured on the network DNS by a network admin.
Wrap up
I hope this worked for you!
There is a less detailed, more visual guide on helpdeskgeek.
For way too much detail, you can read the Microsoft IIS docs.
If you get stuck, you can always Duck around for info online.